Home made hurricane
 This
is a classic from the 1950's editions of the World Book Encyclopedia. I
have fond memories of seeing one of these as a kid. It is a good, silly
science project, and fairly safe for the kids. You need: This
is a classic from the 1950's editions of the World Book Encyclopedia. I
have fond memories of seeing one of these as a kid. It is a good, silly
science project, and fairly safe for the kids. You need: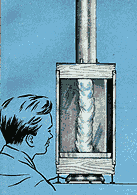
-
4 pieces plywood 3/4"
x 4 1/2" x 16"
(19mm x 114mm
x 406mm)
-
4 pieces plywood 3/4"
x 4 1/2" x 14 1/2"
(19mm x 114 mm
x 368mm)
-
2 pieces plywood 3/8"
x 16" x 16"
(9.5mm x 406mm
x 406mm)
-
4 ceramic standard
incandescent light bulb holders
-
wiring for above
-
3 pieces glass 14"
x 20" (355mm x 508mm)
-
1 piece masonite 14"
x 20"
-
quarter round, 21
feet (6.5m)
-
four 2-foot (610 mm)
sections of 1" (25mm) angle iron
-
pie pan
-
stove or vent pipe
-
hot plate
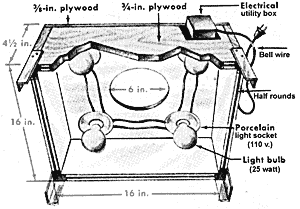 Assemble
a box from 2 pieces each of the 16" and 14 1/2" 3/4"plywood, using a 16"
square for the top. This is the top of the unit, and will orient so the
open end is at the bottom. The finished box should be 16" (406mm) square.
Cut a 6" (150mm) hole in the top for the stovepipe (adjust if the pipe
you are using is a different diameter). Install and wire in 4 ceramic light
bulb holders between the hole and the corners (inside the box). These will
hold 25-watt bulbs. Glue thin (1/4" or 6mm) quarter rounds to the outside
and inside edges of the open-end of the box. These will be guides for the
glass and masonite. Assemble
a box from 2 pieces each of the 16" and 14 1/2" 3/4"plywood, using a 16"
square for the top. This is the top of the unit, and will orient so the
open end is at the bottom. The finished box should be 16" (406mm) square.
Cut a 6" (150mm) hole in the top for the stovepipe (adjust if the pipe
you are using is a different diameter). Install and wire in 4 ceramic light
bulb holders between the hole and the corners (inside the box). These will
hold 25-watt bulbs. Glue thin (1/4" or 6mm) quarter rounds to the outside
and inside edges of the open-end of the box. These will be guides for the
glass and masonite.
 Build
a second box as before. It should also be 16" square. This one will be
oriented so that the open end is the bottom. Add quarter rounds as before,
but on the closed (top) side of the box. One edge will only have an inside
half round so that the masonite wall can be easily removed. Cut an app.
12" (30cm) hole in the top center. This hole needs to be the correct size
to hold the pie pan, so use it to measure. Drill 7 1/2" (20cm) ventilating
holes near the top of any two facing sides. You can fashion adjustable
legs to the bottom (open) end if you wish. Build
a second box as before. It should also be 16" square. This one will be
oriented so that the open end is the bottom. Add quarter rounds as before,
but on the closed (top) side of the box. One edge will only have an inside
half round so that the masonite wall can be easily removed. Cut an app.
12" (30cm) hole in the top center. This hole needs to be the correct size
to hold the pie pan, so use it to measure. Drill 7 1/2" (20cm) ventilating
holes near the top of any two facing sides. You can fashion adjustable
legs to the bottom (open) end if you wish.
 The
inside of the top box should be painted white; the rest of the assembly
can be painted black. Attach the angle irons to the bottom of the unit.
They should attach about halfway up each outside corner. Insert the glass
and masonite pieces, and attach the top box. Attach the stovepipe to the
top. The
inside of the top box should be painted white; the rest of the assembly
can be painted black. Attach the angle irons to the bottom of the unit.
They should attach about halfway up each outside corner. Insert the glass
and masonite pieces, and attach the top box. Attach the stovepipe to the
top.
To
run, take off the masonite, place a pie pan in the bottom, fill it with
water, and replace the masonite. Slide the glass and masonite panels to
the left (relative to each face). Put the hot plate under the pie plate
and turn it on, turn on the lights, wait for the water to boil and voila!
The hurricane!
Annotation
for this picture:
-
A. Stovepipe
-
B. Angle brace
-
C. 1 inch angle iron
-
D. Double weight glass
(14 in. X 20 in.)
-
E. Masonite (14 in.
X 20 in.)
-
F. Adjustable legs
How does it work?
The
air inside the box heats up due to the heat from hot plate and the lights.
It should rise up through the stovepipe, carrying the steam with it. Cooler
air from outside of the box enters through the slits in the side. Since
there is one slit per corner, the air tends to flow in a spiral inside
the box. This is what forms the "hurricane".
Troubleshooting
Most
problems reported by folks constructing this have to do with ventilation.
Make sure that all four sides are open along the same edge - that is, as
you face each side, there should be an app. 1 inch vertical slit running
along each opening. Also, make sure there is enough water in the pie plate
so that it doesn't all boil away before the steam begins to spiral.
Sometimes
there is a problem of not vaving enough "draw" through the stovepipe. Gary
Kaye wrote to add: "I put a small fan at the top of the inside of the stove
pipe. This solved the problem and now the effect looks like a real funnel
cloud." Thanks, Gary!
There
is also a slightly different design at Science
Hobbyist. |